How to Sew a Heart-Shaped Ruffle Pillow
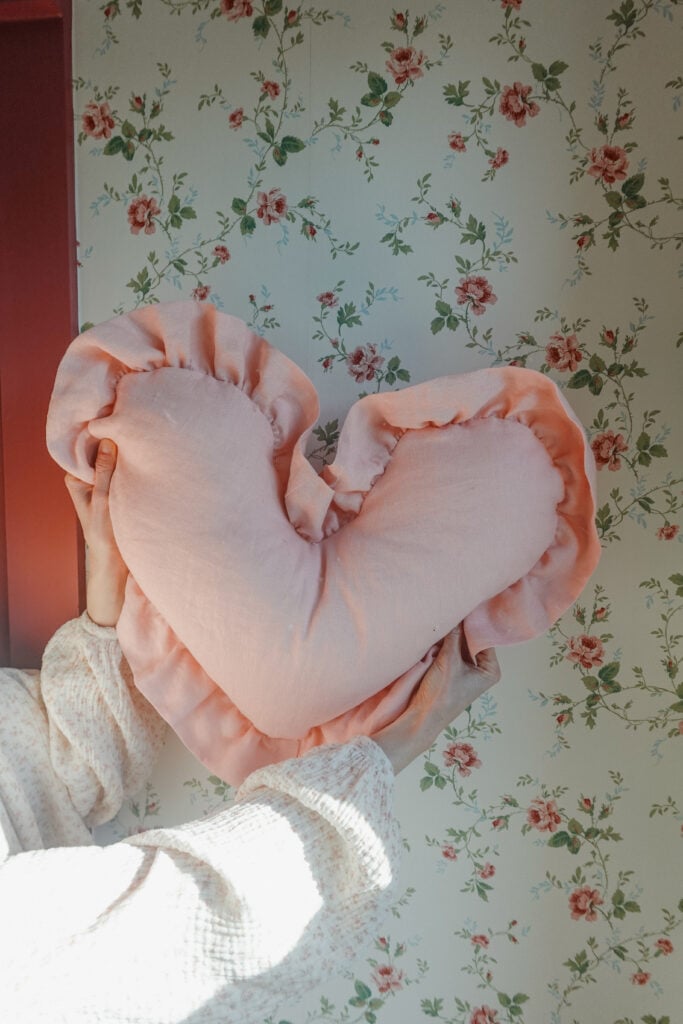
If you love adding handmade, cozy details to your home, a heart-shaped ruffle pillow is the perfect sewing project. This charming pillow works beautifully for Valentine’s Day, nurseries, little girls’ rooms, or anywhere you want a soft, romantic touch. Best of all, it’s beginner-friendly and customizable with your favorite fabrics.
Below is a step-by-step tutorial that walks you through exactly how to sew a heart-shaped ruffle pillow from start to finish.

Materials for Heart-Shaped Ruffle Pillow
Before you begin, you’ll need a few supplies:
- Roughly 2 yards of fabric for the outside of the pillow (front, back, and ruffle)
- Roughly 1 yard of a plain flannel fabric for structure (optional)
- Polyfill stuffing
- Matching thread
- Sewing machine
- Fabric shears (or a rotary cutter)
- Pins (I like using quilting clips for ruffle pillows)
- Iron
- A large piece of paper for your heart template

How to Sew a Heart-Shaped Pillow
Step 1: Create Your Heart Template

To start your heart-shaped ruffle pillow, you’ll need a heart template.
- Using a large piece of wrapping paper, draw half of a heart-shape along the straight edge. You will use this template to cut out your heart shapes. The idea is when you unfold your fabric piece you will have one large heart that is symmetrical on both sides. For a general idea, my heart template was 20 inches tall from the crest of the arch all the way to the bottom point of the heart, and about 12 inches wide.
- Cut it out your wrapping paper heart shape carefully—this will be your pattern.
- You will use this same template for both the main fabrics and flannel fabrics to keep everything symmetrical.
Quick tip: When drawing your template, make sure you save room for your seam allowance (make it slightly bigger than you want your pillow to be)! I used about a 1/2-inch seam allowance for my pillow.
Step 2: Cut Your Fabric Pieces

Using your heart template:
- Cut 2 hearts from your main fabric (pink fabric, in my case).
- Cut 2 hearts from your flannel fabric.
For the ruffle:
- Cut long fabric strips about 3–4 inches wide
- The total length should be 1.5 to 2 times the perimeter of the heart for a full, gathered ruffle.
Press all fabric pieces before moving on—this is just a good rule of thumb anytime you’re sewing. It makes the entire process much easier!
Step 3: Prepare the Ruffle

For you ruffle, you will need a long strip of fabric that is 5 inches wide and about twice the length of the perimeter of your heart shape. To find the perimeter, simply use a measuring tape and measure around the edge of your heart template, then multiply that number by 2 to get the entire heart perimeter. In my case it is 74 inches. So I will multiply that number by 2 to get 148 inches. This means I need a long strip of fabric that is 5 inches wide and 148 inches long.
In order to get one long piece, you will likely need to piece together multiple pieces of fabric. So, I like to cut multiple 5-inch strips as wide as my fabric is (typically 45 inches). In that case, I would need to cut about 4 (45-inch) strips of fabric at 5-inches wide to get to one long 5×148-inch piece.
With right sides together, sew ruffle strips together end to end with a 1/2″ seam allowance, forming one big circle. If you’re not sure what I mean by this, watch the process of me making the ruffle for this quilt!
Press the seams open. You should now have one long circle of fabric.
Step 4: Sew your gathering stitches

- Fold each ruffle strip in half lengthwise, wrong sides together. Press to create a clean folded edge.
- Sew 2 long gathering stitches along the raw edge of your fabric (use the longest stitch length your machine will do).
Without backstitching, and leaving long tails of thread on the ends,sew two long basting stitches, first at 1/4-inch from the raw edges, then at just under 1/2-inch from the raw edge. Sew all the way around the circle, stopping when you get to your starting point. Make sure to leave long thread tails on each end.
- Begin to gather the ruffle by pulling on the bottom (bobbin) threads and simultaneously pushing the fabric along the thread. Quick Note: This will take a little while, but be patient. If you rush this process you will likely end up breaking your thread. Work slowly and don’t pull too hard or try and force it. You’ll find the sweet spot!
As you work, check to see how the ruffle is fitting around your heart shaped piece. You want it to line up perfectly along the perimeter of the heart shape, with the folded edge of the ruffle facing inwards and the raw edges of both the ruffle and the heart shape aligning.
Again, if you’ve never sewn a ruffle for anything and you just want to watch the process, check out this video.
Step 5: Sandwich everything together

Now it’s time to assemble the layers of your heart-shaped ruffle pillow.
- Layer the fabric as follows: flannel, main fabric heart (right side up), ruffle (folded edge facing inward), main fabric heart (right side down), flannel.
- Align the raw edges and pin or clip all the way around. Make sure when you’re pinning that you leave roughly a 6-inch gap on one side of your heart for stuffing the pillow at the end.
- Adjust the gathers so they’re evenly spaced.
- Stitch at 1/2-inch seam allowance from one side of the opening, all the way around the heart to the other side of the opening.
Take your time here—smooth curves make a big difference in the final look.
Step 6: Stuffing the Heart-Shaped Ruffle Pillow

- Turn the pillow right-sides out using the opening you left on one side. Check all of your ruffles to make sure you don’t have any spots where the ruffle got caught under your stitches (this happens a lot, especially in the corners!).
- Once you’re happy with how your pillow is looking, turn it back inside-out and snip the corner off of the bottom of your heart pillow and make a small incision where the 2 heart curves intersect in the top center of the pillow (do not cut through your thread).
- Turn everything right sides out and begin stuffing with polyfill. I like using this down alternative fill because it looks less lumpy!
Step 7: Ladder Stitch and Final Touches

To close the opening on the side of your pillow we will use a ladder stitch. If you’ve never done one of these before, here’s a tutorial. I like to stitch the ruffle to one side using a ladder stitch first, then stitch the 2 sides together using another ladder stitch. This makes it easier!
Finally, go ahead and cut away any loose threads.
Your Heart-Shaped Ruffle Pillow is Complete!
I hope you loved this tutorial and that it’s helpful for you! If you do make one of these pillows, please send me a photo on Instagram @sarahsdayoff because I truly would love to see it! And of course, if you have any questions please drop a comment below, shoot me an email at sarah@sarahsdayoff.com, or send me a message on Instagram!
If you’re looking for more beginner sewing projects, check out this pacifier clip tutorial. They make great gifts, and my babies have all used these!
Love,
Sarah
Leave A Comment