How to Sew a Reusable Fabric Birthday Balloon Banner (Free Sewing Pattern)
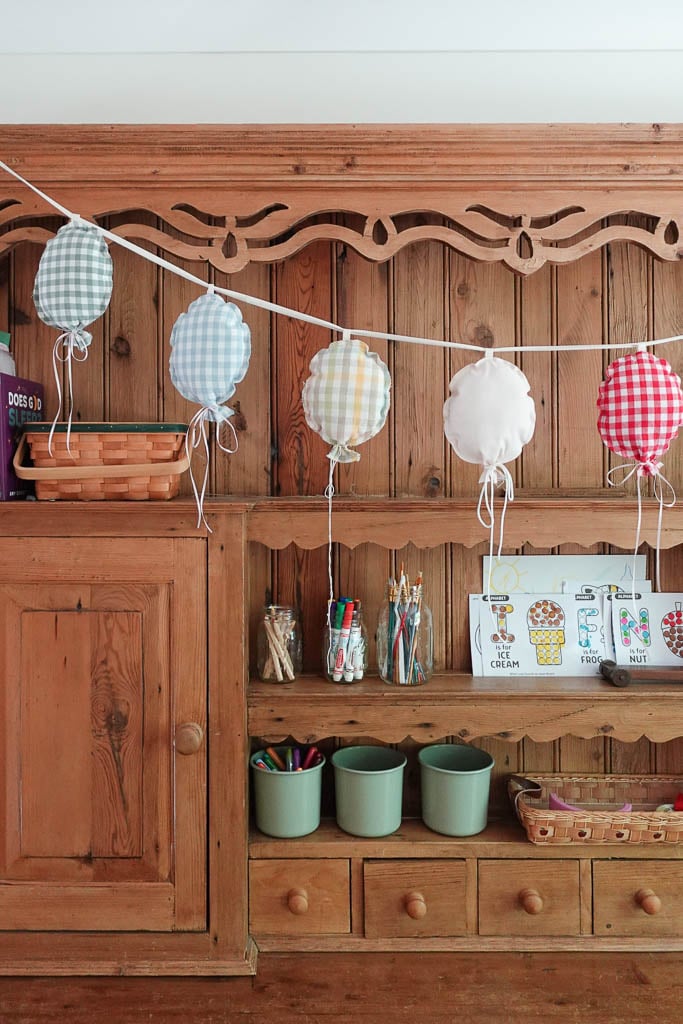
This DIY fabric balloon banner is one of my favorite traditions to make and reuse. It’s soft, colorful, kid-friendly, and best of all… it never pops!!
One of my favorite traditions in our family is our birthday box. For every birthday, no matter whose it is, we have a little box that holds all of our birthday decor. When Noah and I first got married, and before I started sewing and crafting, it held some of my favorite store-bought birthday decorations. But since then, I’ve slowly been replacing the store-bought with the lovingly handmade.
There’s something special about pulling out the same birthday decorations year after year—the ones that hold memories from each celebration.
This DIY fabric balloon banner is one of my favorite traditions to make and reuse. It’s soft, colorful, kid-friendly, and best of all… it never pops!!
Today I’m walking you through exactly how to sew a reusable balloon banner, plus I’ve included a free printable sewing pattern to make it easy for you to replicate.

Supplies You’ll Need
- Balloon Template (Download HERE)
- Fabric: Scraps are welcomed, but if you need to purchase fabric, I would use a mid-weight cotton or a nice linen.
- Matching thread: you will see the seams on this project so make sure you don’t mind the color.
- Fabric shears or rotary cutter
- Sewing machine
- Polyfill: you’ll need this to stuff your balloons, but as an alternative you could use fabric scraps cut up into fine pieces, another cotton fiber fill, or anything else you can think of. Get creative!
- Pins
- Twill tape: for adding little tabs to the top of your balloons, and also as an option for stringing the garland together. My tape is 1/2-inch wide.
- Iron
- Heat-erasable pens : not required, but highly recommended for tracing your balloon template.
- Pinking shears : not required, but it looks nice to have a fun pair of scissors to trim the edges of the balloons if you want to!
- Small ribbon: for finishing the balloon at the bottom

How to Sew a Birthday Balloon Banner
Step 1: Cut a 10″ x 15″ square and fold it in half lengthwise


Folding a rectangle in half will just allow you to cut both balloon pieces out at one time.
You can skip this step – I just find it easier to cut both balloon pieces at one time for a cleaner finish. As an alternative, you can just cut your 2 balloon pieces out one at a time.
Step 2: Cut out your fabric

Next we will pin the pattern piece to the folded piece of fabric. Use a pair of fabric shears to cut out the balloon.
Step 3: Transfer the notch marking and pin the pieces together


You’ll notice there is a notch marking at the top of the pattern piece. This is where you will insert your twill tape tab. Transfer this marking to the right side of one of your pattern pieces using a heat-erasable pen (or other marking pen).
Pin the 2 pattern pieces together, wrong sides facing.
Step 4: Insert the twill tape


Cut a 3-inch piece of twill tape. My tape is 1/2-inch wide. Fold it in half, and sandwich it in between the 2 pattern pieces with the raw edges facing inside the balloon. The loop should be exposed. Refer to your notch so you will know where the center is. You will want about 1/2-inch of the tape exposed, which will be enough to string it along a garland!
Pin the twill tape in place.
Step 5: Sew the pieces together


IMPORTANT: Leave the opening designated on the pattern piece open. So, you will sew from one pointed end all the way around the balloon to the other pointed end, leaving the bottom open.
I used a 1/4-inch seam allowance for this project.
Also important: make sure you backstitch at the beginning and the end!
Step 6: Fill your balloon

Use your favorite fiber fill (I love this one) to stuff your balloon using the opening you left at the bottom. I would say I stuff mine about medium fullness. It’s not firm by any means, but there’s definitely fill in it. Do what you prefer!
Step 7: Sew the opening closed


Pin the opening closed (if necessary). Using a 1/4-inch seam allowance, sew the opening closed, again making sure to backstitch at the beginning and the end.
Finish your balloon with a small piece of ribbon tied around the bottom in a bow to make it look more like a balloon.
Step 8: String the balloon garland together

You can use twill tape for this part or another favorite string/ribbon. Just remember that the tabs on the balloons are 1/2-inch wide, so choose something that will fit that width.

Yay! You finished your balloon banner. I hope this becomes a tradition in your family, just like I think it’s going to in mine! The special will never wear off of this one.

Other fun birthday decor ideas…
One of my other favorite things in our birthday box is our Happy Birthday banner! If you want to make your own, check out this post on making your own letter banner (and there is also another free pattern included on the post).
You can also use these letter templates to sew any sort of banners – names, celebrations, you name it!
If you make this project, please tag me or send me a message @sarahsdayoff so I can see all of your makes! And if you have any questions, feel free to shoot me an email at sarah@sarahsdayoff.com or via DMs!
Happy sewing!
Love,
Sarah
“For God didn’t give us a spirit of fear, but of power, love, and self-control.” -2 Timothy 1:7-
Leave A Comment