DIY Fabric Lampshade: How to Make a Ruffled Lampshade Cover
Learn how to make a DIY fabric lampshade cover with a soft ruffle using fabric, elastic, and basic sewing supplies. A simple cottage-style home decor project.

DIY Fabric Lampshade: How to Make a Ruffled Fabric Lampshade Cover
There’s just something about a little fabric detail that makes a room feel more custom, more collected, and more.. you! And lately, I’ve been loving all the pretty gathered and ruffled lampshades I’ve seen popping up in cottage-style spaces.
I’ve really been wanting to add a couple of these to my home, but the problem is that a lot of these can be pretty pricey.
So, naturally, I decided to try making my own.
This diy fabric lampshade cover is such a sweet and simple way to update a lamp you already have. It slips right over your existing lampshade, which means you don’t have to commit forever, you don’t have to recover the shade permanently, and you can easily switch it out if you want a different fabric later.
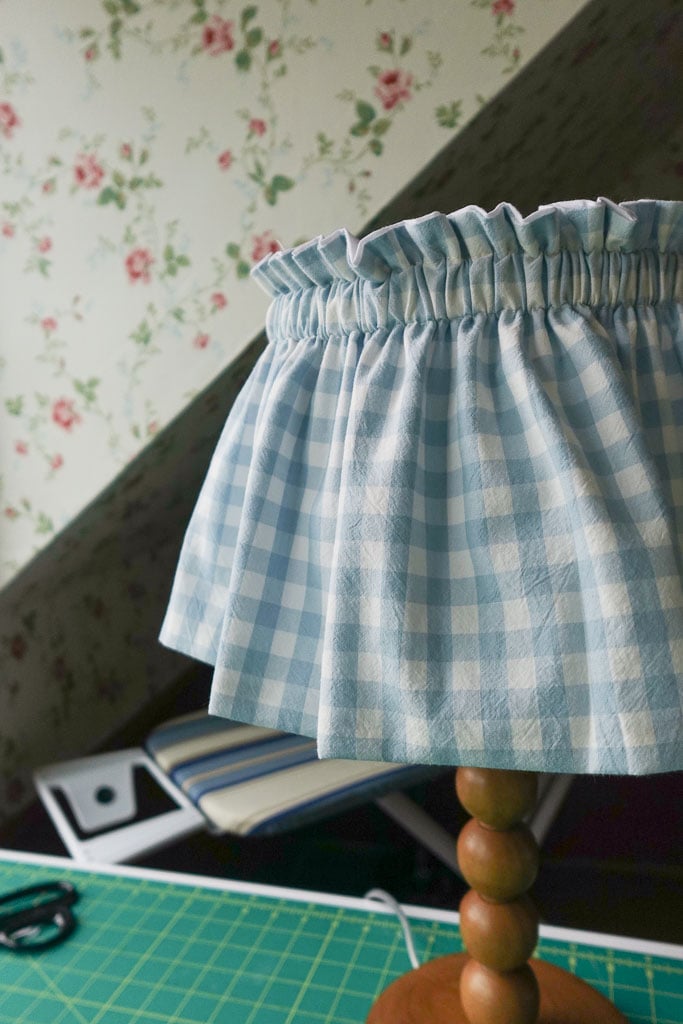
I used a gingham tablecloth, some elastic, and basic sewing supplies to create a gathered lampshade cover with a soft little ruffle at the top. It instantly made my lamp feel more charming and custom, and it was honestly such a fun little afternoon sewing project.
If you’ve been wanting to add more pattern, texture, or cottage charm to a room, this DIY ruffled fabric lampshade is such a good place to start.
Why Make a DIY Fabric Lampshade Cover?
I love projects like this because they make such a big difference without requiring a huge budget or a full room makeover.
A fabric lampshade cover is perfect if you have a lamp that feels a little plain, a shade that doesn’t quite match your space anymore, or a fabric scrap you’ve been saving because it’s too pretty to throw away.
This project is also really forgiving. The gathered fabric gives you a lot of flexibility, and the elastic helps the cover fit snugly around the lampshade without needing everything to be perfectly tailored.
Basically, it’s the kind of sewing project that looks more impressive than it actually is — my favorite kind.
Supplies You’ll Need
To make this diy fabric lampshade, you’ll need:
- Fabric of your choice (I used this gingham tablecloth)
- Lining fabric, I used just a cheap white fabric from Hobby Lobby
- ¾-inch elastic – for the top of the lampshade
- Coordinating thread
- Sewing machine
- Fabric shears or rotary cutter
- Measuring tape – for measuring the circumference of the lampshade
- Heat-erasable pens : not required, but highly recommended for the cutting process.
- Safety pin – you’ll need one of these to feed the elastic through the channel in the fabric!
- Pins or clips
- Iron
For the fabric, I recommend using a lightweight cotton or linen. You want something with enough structure to hold a pretty gather, but not something so thick that it becomes bulky around the shade.
A small floral, gingham, stripe, or block print would be so cute for this project. This is also a great way to use leftover fabric from another sewing or home project.
Step 1: Measure Your Lampshade
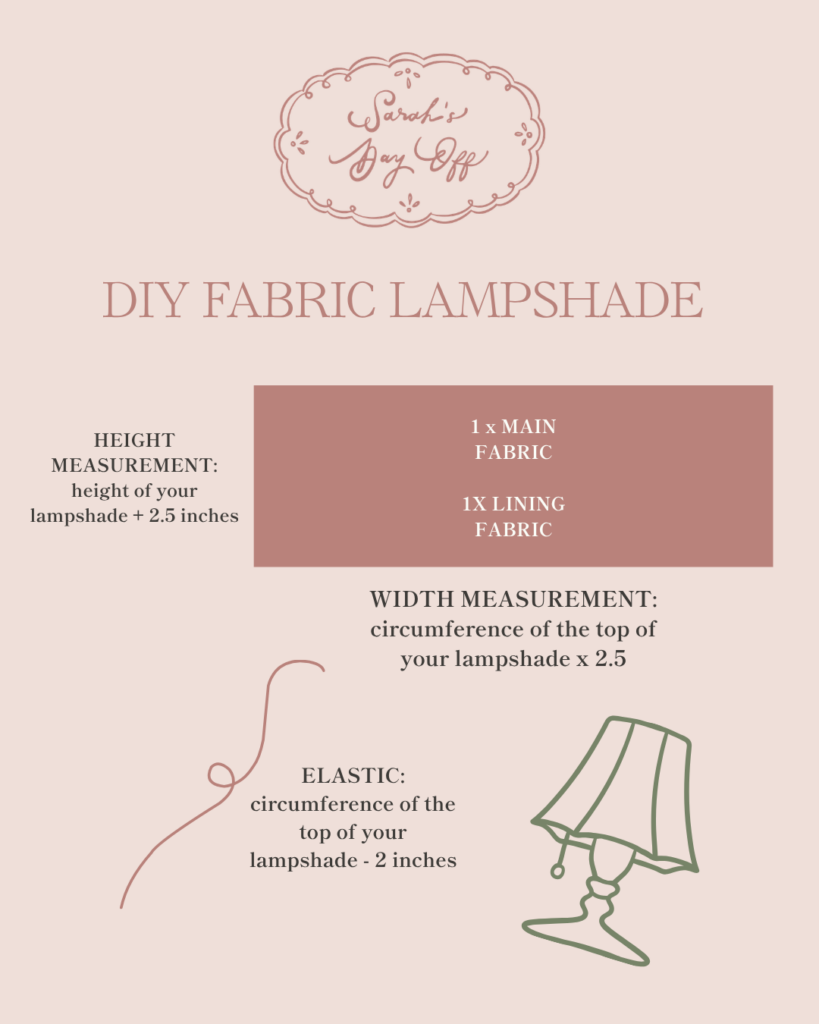
Before cutting your fabric, measure around the top of your lampshade. This is the circumference.
Then measure from the top edge of the lampshade down to the bottom edge. This will tell you how tall your fabric piece needs to be.
For a gathered, ruffled look, your fabric should be much wider than the lampshade itself. I would plan for your fabric to be about 2 to 3 times the circumference of the top of your lampshade. The more fabric you use, the fuller and more ruffled your lampshade cover will look.
For the height, add a few extra inches so you have room for the ruffle, elastic casing, seams, and a little overhang at the bottom if you want it.
This is one of those projects where a little extra fabric is better than not enough.
So, for my lampshade that has a top circumference of 25 inches and a height of 7 inches, I cut rectangles that were 68 inches x 9.5 inches. It seems like a lot of fabric for a lampshade at first, and if my lampshade is too full for you, you can decrease that circumference number a little bit!
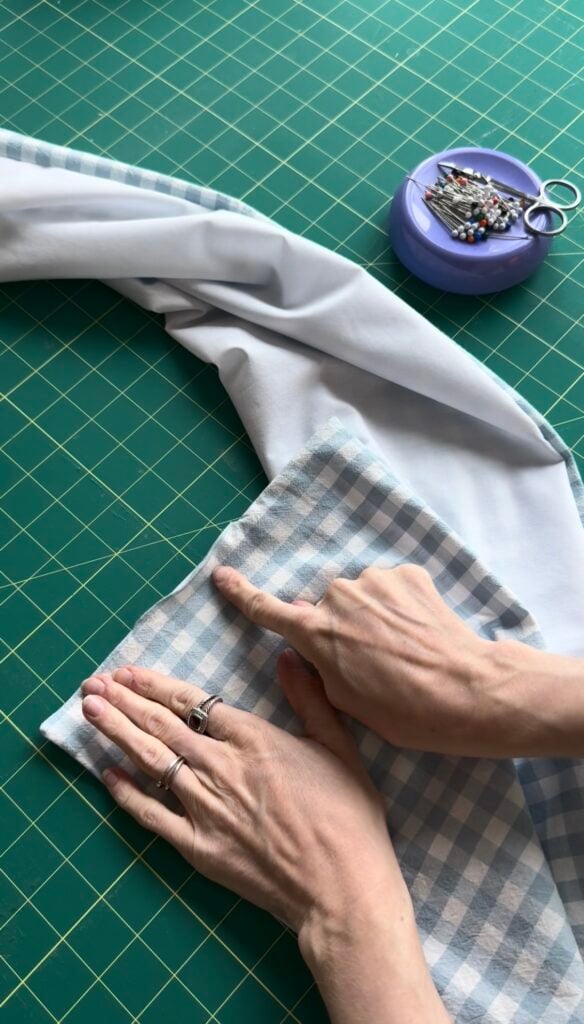
Step 2: Cut Your Fabric
Cut your main fabric and lining fabric to the same size.
You’ll be cutting one long rectangle from your main fabric and one long rectangle from your lining fabric.
Also go ahead and cut out your elastic piece. You want it to be roughly 2 inches shorter than your circumference measurement. So, I cut a 23-inch long piece of elastic.
Step 3: Sew the Main Fabric and Lining Together
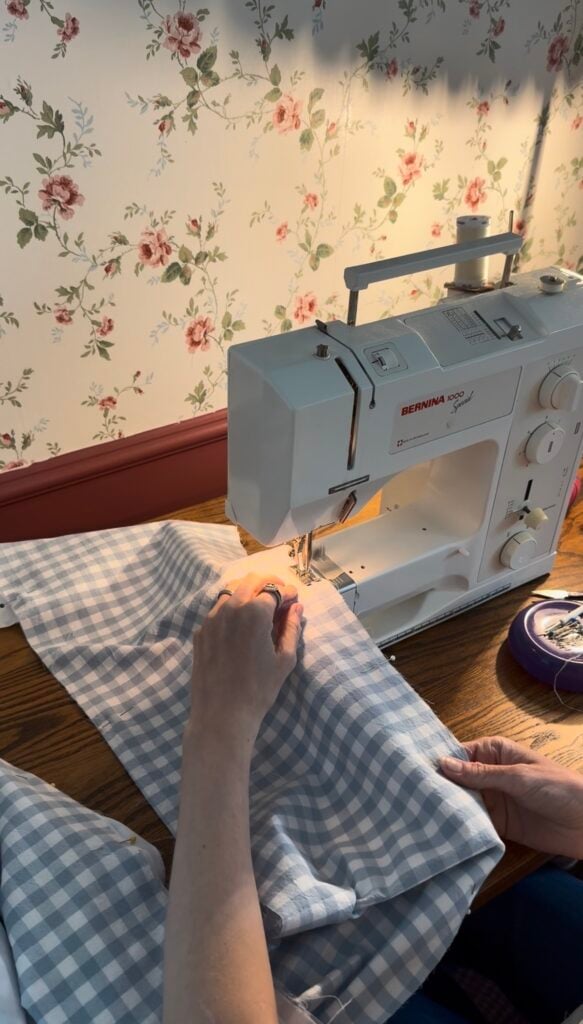
Place your main fabric and lining fabric right sides together.
Sew around the edges at 1/2-inch seam allowance, leaving a small opening on one of the shorter ends so you can turn the fabric right side out. Once you’ve sewn around the rectangle, trim the corners, turn it right side out, and press everything flat.
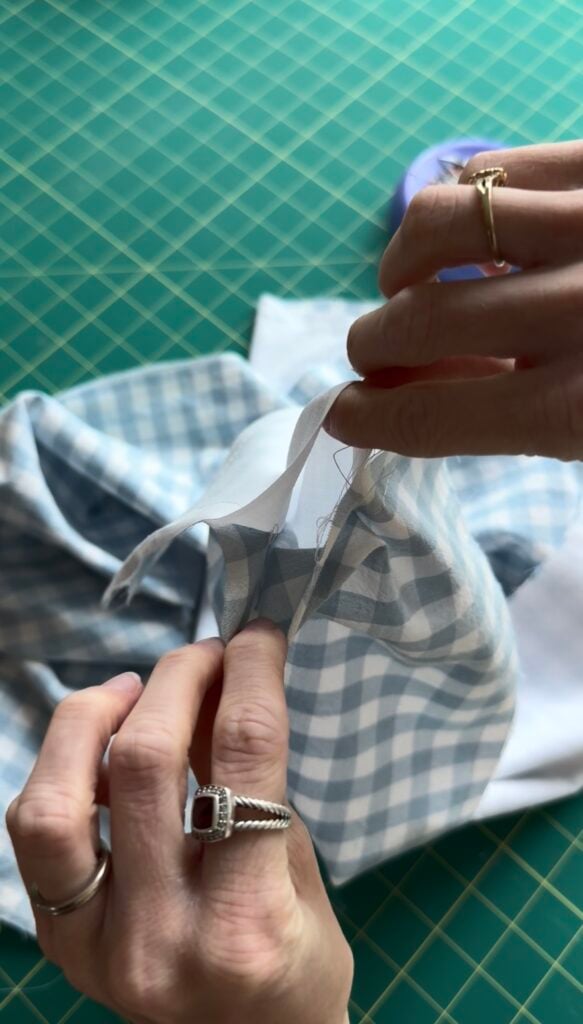
Then stitch the opening closed.
At this point, you should have one long, finished rectangle of fabric. It may not look like much yet, but this is where it starts coming together.
Step 4: Create the Ruffle and Elastic Channel

Now it’s time to create the top ruffle.
Sew one straight line across the top of the fabric, about 3/4-inch or so down from the top edge. This will create the little ruffle that sits above the elastic.
Then sew a second line 1 inch below that, which will leave enough space between the two lines for your elastic to slide through. This space becomes your elastic channel.
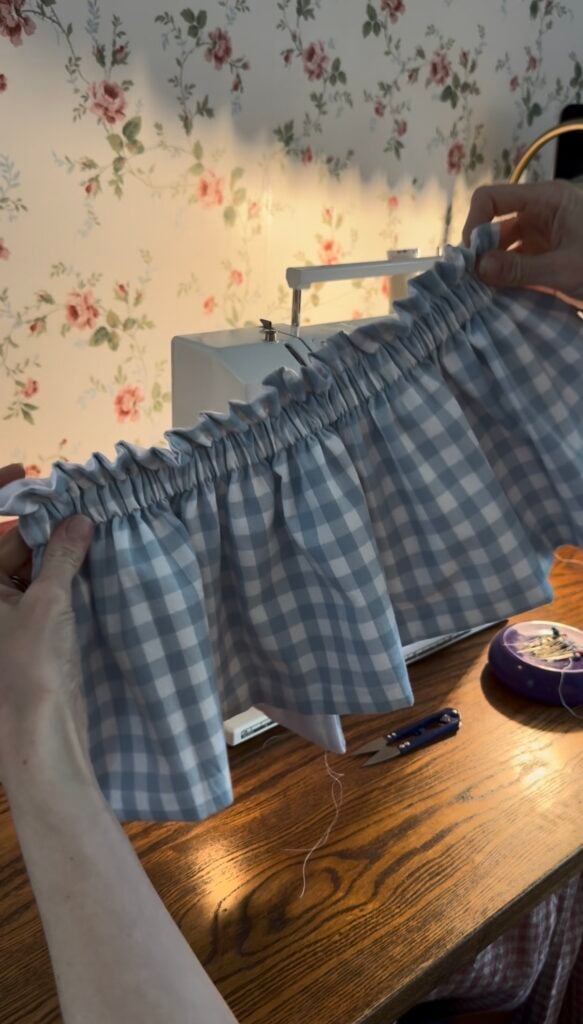
Step 5: Add the Elastic
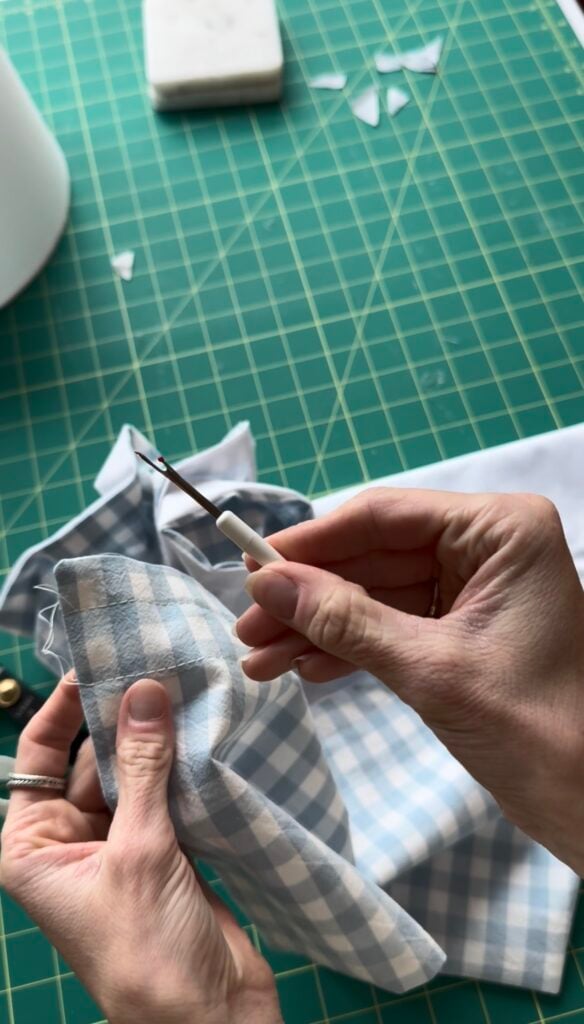
Look at one of the short ends of your fabric. Use your seam ripper to gently tear the seam open between your 2 lines. This will open the fabric so you can feed the elastic through the channel.
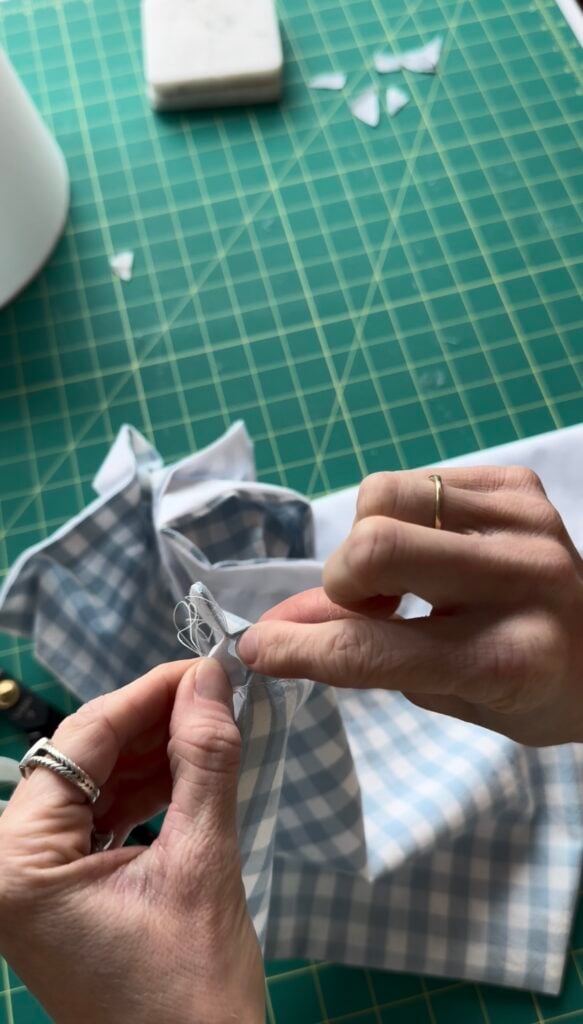
Attach a safety pin to one end of the elastic and thread it through the channel. As you pull the elastic through, the fabric will start gathering, which creates that pretty ruffled look.

Once the elastic is all the way through, pin both ends of the elastic to the fabric so you don’t lose it inside the channel. Test the cover on your lampshade before sewing the elastic closed. You want it to fit snugly, but not so tight that it’s hard to slip on.
Step 5: Sew the Short Ends Together
Fold the fabric right sides together with the short ends touching. Pin along this edge and sew with a 1/2-inch seam allowance. This will ensure your elastic stays in place and will finish your lampshade!
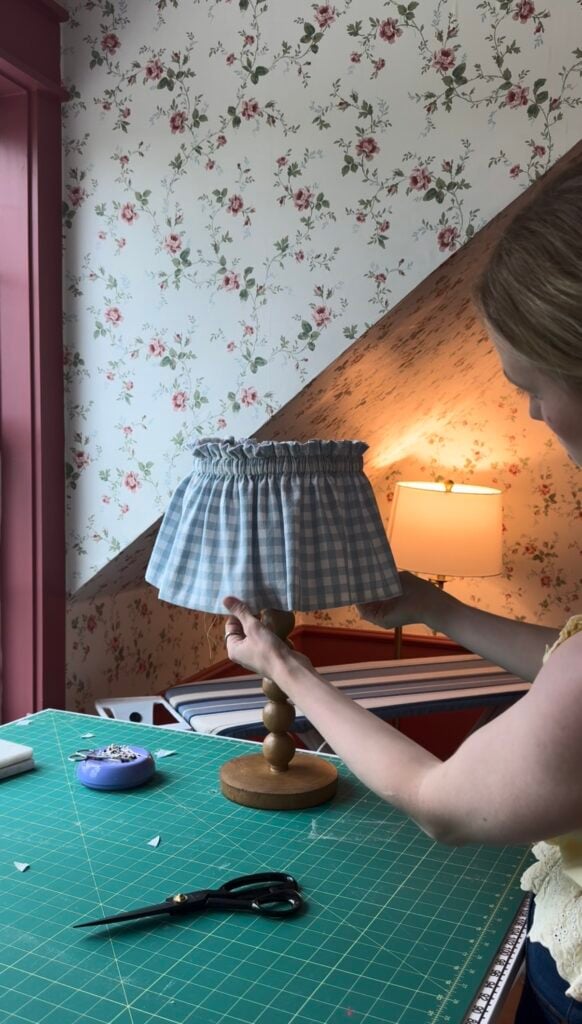
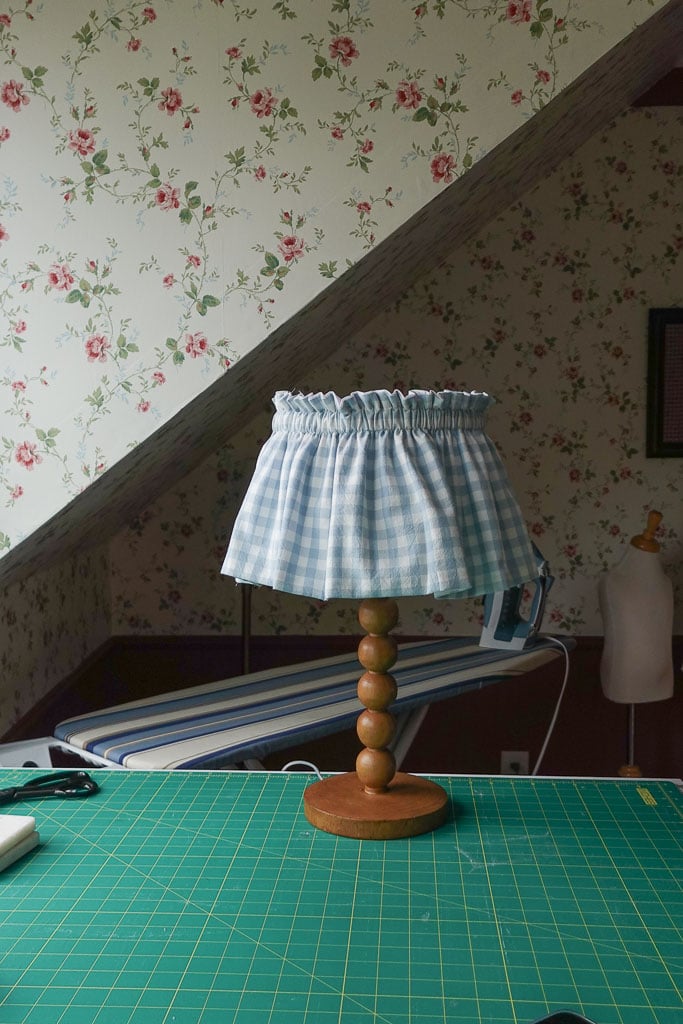
Step 6: Slip the Cover Over Your Lampshade
Now for the fun part!!
Slip the fabric cover over your existing lampshade and adjust the gathers until they look even. Fluff the ruffle at the top, straighten the bottom edge, and make sure everything sits nicely.
That’s it!
You now have a custom-looking diy fabric lampshade without actually recovering or replacing your shade.
Tips for Making a Ruffled Fabric Lampshade Cover
Use more fabric than you think you need. The fullness is what makes this look so pretty, and if the fabric is too skimpy, it won’t have that soft gathered look.
Choose a lightweight fabric. Quilting cotton, linen, gingham, or a thin block print fabric would all work beautifully.
Test the elastic before finishing it. Every lampshade is a little different, so it helps to try the cover on before sewing the elastic closed.
Don’t stress over perfection. The gathers are very forgiving, and once the cover is on the lampshade, little imperfections really do disappear.
A Simple Way to Make a Lamp Feel Custom
I love how this project makes a basic lamp feel so much more special.
A DIY fabric lampshade is one of those little details that can pull a room together without making everything feel too matchy-matchy. You can use the same fabric from another project, choose a coordinating pattern, or add a tiny pop of color to a corner that feels unfinished.
And since this is just a slipcover, you can always take it off later. I love that it’s not permanent. You could even make a few different covers and change them out seasonally.
A floral fabric for spring, a gingham for summer, a warm stripe for fall — you know I love a project that gives me an excuse to play with fabric.
Final Thoughts
This diy fabric lampshade was such a simple and satisfying project. It gave new life to a lamp I already had and added that soft, gathered, cottage-style look I’ve been loving lately.
If you’re wanting to make your home feel more custom without spending a lot, try making a ruffled fabric lampshade cover. It’s beginner-friendly, budget-friendly, and such a sweet way to use fabric in your home.
Now I’m looking around wondering what other lamps need a little ruffle.
Because once you make one, it’s very tempting to make another.
I hope you all love this tutorial, and as always please let me know if you have any questions!
Love,
Sarah
“For ‘Everyone who calls on the name of the Lord will be saved.'” -Romans 10:13-
Leave A Comment