Pull-Apart Garlic Dinner Rolls
These Pull-Apart Garlic Dinner Rolls are the only dinner roll recipe you’ll ever need. Step-by-step instructions and flavor variations included for making these your own!

What are Pull-Apart Garlic Dinner Rolls?
Unlike regular dinner rolls that you may find at the grocery store in the freezer section (and don’t get me wrong, I love those just as much as you do), these garlic dinner rolls are soft, and pillowy, and balance the flavors of garlic and butter perfectly.
Additionally, these homemade garlic dinner rolls are shaped and formed individually, allowing for them to be spaced a little bit apart when baking. This allows for air to circulate more evenly, resulting in garlic dinner rolls that are perfectly baked, even the ones in the center of the pan.
We also love pull-apart dinner rolls around here because it couldn’t be easier to pull them apart. No fuss is needed at the dinner table. Just pass the pan, choose your roll, and enjoy.
Why this recipe works
Let’s talk about the tangzhong technique. If that sounds like a foreign language, that’s because it stems from a method used in making Japanese milk bread, a soft and pillowy bread that’s been rather trendy lately.
Tangzhong is a technique used in bread baking to create softer, fluffier bread (and it doesn’t hurt that it helps extend the shelf life of the bread). Essentially, you cook a portion of the flour and liquid (in the case of these pull-apart garlic dinner rolls, it’s milk) from the recipe into a roux-like paste before incorporating it into the dough. This results in an extremely moist bread that holds its texture after baking and even into a couple days later.
I learned this method from Claire Saffitz, an incredible pastry chef from the United States with 2 incredible cookbooks. This recipe for pull-apart garlic dinner rolls was adapted from her sour cream and onion dinner roll recipe (from her book, Dessert Person). This is hands down my favorite cookbook on my shelf and I couldn’t recommend it more for a budding baker!

Tangzhong dinner rolls
Why use a tangzhong?
If you still need some convincing, aside from the endless compliments I get each time I make and serve these rolls, check out some of the science behind why this method works so well for dinner rolls in particular:
- Improved Texture: It makes the pull-apart garlic dinner rolls softer and more tender.
- Increased Moisture Retention: Breads made with the tangzhong method stay fresh longer (aka, prevents them from going stale).
- Better Rise: The pre-gelatinized flour helps the dough trap more gas during proofing and baking, which then makes these garlic dinner rolls ‘explode’ into a beautiful, pillowy bread once they hit the heat of the oven.
Not only does this method of bread-making work great for this garlic dinner rolls recipe, but it really works great in any enriched bread recipe (like homemade cinnamon rolls, these chocolate cinnamon rolls, and though I’ve never tried it, could be great in these easy homemade yeast donuts.

Some equipment you may need…
- Stand mixer: this is more on the necessary side for this garlic dinner rolls recipe – as you’ll need to knead the dough for quite some time. Of course, you’re always welcome to do this by hand, but if you’ve got a mixer I’d highly recommend using it! I love mine from KitchenAid.
- Measuring cups/spoons: I’ve been linking these in all of my posts because I love them SO much! They are beautiful and look just like some other expensive ones on the market (but much cheaper).
- Metal Cake Pan: This pan is a work horse in my kitchen – I use it all the time. Whether it’s a funfetti sheet cake, chocolate cinnamon rolls, or this super moist pumpkin coffee cake, it will always have a use in my kitchen.
- Bench Scraper: this will prove to be a very useful piece of equipment for these pull-apart garlic dinner rolls. You’ll need it when cutting the dough into individual rolls. You can use a sharp knife, but I’ve found the bench scraper makes things much easier.

Ingredients for Pull-Apart Garlic Dinner Rolls
Possible flavor variations for garlic dinner rolls
Browned butter dinner rolls
I think we can all agree that browned butter makes everything better. Just ask my browned butter rice krispie treats – they’ll tell you. For this pull apart dinner rolls recipe, when you go to brush the rolls with butter after baking – use browned butter instead of regular melted butter for a nutty flavor variation.
If you’ve never browned butter at home before, check out this easy tutorial on browning butter.
Everything bagel dinner rolls
I think this could be a really interesting flavor twist on these pull-apart dinner rolls. After you do the egg wash and before you bake the rolls, sprinkle them with about 1 to 2 Tbsp of everything bagel seasoning. I think I may try this the next time I make them!
Sun-dried tomato and basil
We are big fans of sun-dried tomatoes over here – I add them to anything I can think of at home. It only makes sense that they’d be delicious in this pull-apart dinner rolls recipe. I’d leave all the garlic amounts the same, but add in about 1/2 cup chopped sun-dried tomatoes when you fold the dough up. Then, sprinkle with basil after the egg wash and before baking the rolls. Voila – perfect Italian-style pull-apart dinner rolls!

How to Make Garlic Dinner Rolls
Step 1 – make the tangzhong

First, you’re going to make the tangzhong – and as we discussed above, this is a popular method of starting bread (like in Japanese milk bread). It makes the end result of your rolls soft and fluffy!
You’ll need to do this on the stovetop in a saucepan. You’ll be combining a portion of the flour, milk, and water, and stirring it over medium heat until it looks somewhat like mashed potatoes. It will thicken quickly, so you’ll want to stay over the counter the entire time.
Step 2 – knead the dough / first rise

This kneading can be done either by hand or by using a stand mixer. I prefer the stand mixer because it will likely take around 8 to 10 minutes.
If your dough feels too sticky here, add more flour, 1 Tbsp at a time, until it’s no longer too tacky.
Step 3 – roll out the dough / enclose garlic

After proofing the dough the first time, you’ll want to enclose the garlic. We’ll roll out the dough into a 12-inch square and evenly sprinkle the garlic over it. Then, we’ll roll it up into a long rectangle.
Step 4 – shape rolls / second rise


Next, we’ll roll the dough out into a larger rectangle and cut the dough balls into roughly 2-inch squares. This will help us make 24 evenly sized rolls. Then you’ll form these squares into balls and place them in the pan.
These will proof for another 45 minutes before you bake them! If you’d like to start these the night before, read the instructions below.
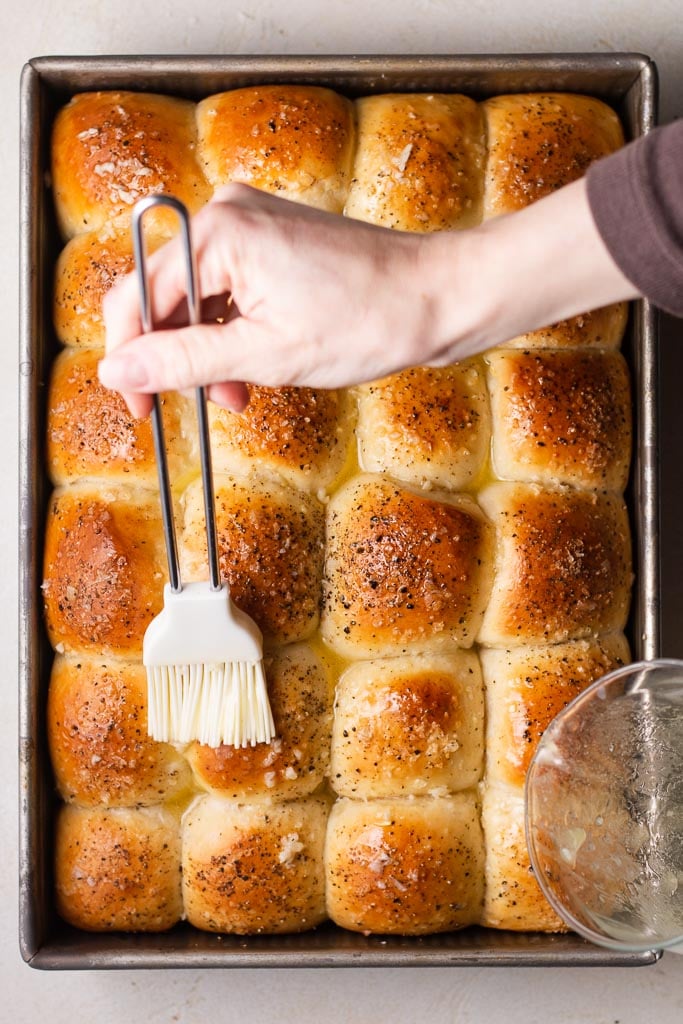
Step 5 – egg wash, bake, and butter bath

These rolls need an egg wash before baking, so use your final egg to brush the top of each roll. Then, sprinkle on some flaky sea salt and pepper, and bake them for approximately 30 minutes, until the tops are golden brown.

My Kitchen Tips
Add extra flour to the dough, if needed
You may need to incorporate more flour into the dough while kneading. These pull-apart garlic dinner rolls are meant to have a soft and supple dough, so if it feels too sticky after the initial knead, feel free to add some more flour, 1 Tbsp at a time, until it’s not too sticky anymore.
Don’t forget the salt and pepper
You could argue that this recipe wouldn’t be all that it is without flaky sea salt. It’s really easy to forget to add it after you’ve done the egg wash and before baking, but don’t forget! The egg wash will help hold the salt in place even after baking, so that way it’s not just sliding around and not ending up on your pull apart dinner rolls.

Garlic Dinner Rolls FAQs
How to reheat dinner rolls
If you’re reheating these rolls after it’s been over 1 day, the gold standard for doing so would be to preheat your oven to 350°F, wrap the rolls in aluminum foil to retain moisture and prevent them from drying out, and bake them on a small baking sheet for about 10 to 15 minutes, just until they’re heated to your liking.
Best way to warm dinner rolls
If you’re just warming these rolls less than 1 day after baking, I’d just heat them briefly on a plate in the microwave for about 10 to 15 seconds. They will heat pretty quickly so no need to go any longer than that.
Can I make these in advance?
Yes, you can make these pull-apart garlic dinner rolls in advance. It’s one of the things I love most about this recipe. Because we’re using a tangzhong in the method, they will retain their moisture content much better than regular dinner rolls – meaning you can bake them about a day or 2 in advance, let them cool completely in the pan, wrap the entire pan in plastic wrap, and refrigerate them overnight.
The next day, preheat your oven to 350°F, cover the pan with aluminum foil to retain moisture and prevent them from drying out, and bake them for about 15 to 20 minutes, just until they’re heated to your liking.

Overnight dinner rolls
I always make my dinner rolls the night before I’m planning to serve them. Here’s what I do:
- Make the dough and do the first rise.
- Shape the dough into rolls and place in the prepared pan.
- Cover the pan in plastic wrap and refrigerate overnight.
- The next morning, set the pan out at room temperature for approximately 3 hours, or until the dinner rolls have begun to puff up and are nearly doubled in size.
- Brush the rolls with an egg wash and bake as the recipe states.
I hope you all love this recipe as much as I do. These garlic dinner rolls truly are a staple in our family. I make them every year for Thanksgiving and Christmas events and I don’t think that will ever change!
If you have any questions about this recipe or another on my site, feel free to send me an email at sarah@sarahsdayoff.com, or leave a comment down below! And as always, don’t forget to follow along over on instagram @sarahsdayoff to stay up-to-date on things going on in my kitchen!
Love,
Sarah
“May the Lord bless you and protect you. May the Lord smile on you and be gracious to you. May the Lord show you his favor and give you his peace.” -Numbers 6:24-26-

Pull-Apart Garlic Dinner Rolls
Ingredients
- 1/2 cup whole milk
- 5 1/3 cups bread flour (693g)
- 1 cup sour cream
- 2 Tbsp granulated sugar
- 4 tsp kosher salt
- 3 large eggs, divided
- 1/2 cup unsalted butter, at room temperature (cut into pieces), divided
- 1 (1/4-oz) packet active dry yeast (2 1/4 tsp)
- 3 Tbsp minced garlic, divided
- Flaky sea salt
- Freshly ground black pepper
Instructions
Making the Dough
- Whisk 1/2 cup milk, 1/3 cup flour, and 1/2 cup water in a small saucepan until smooth. Set over medium heat and cook, stirring contsnatly, until you have a very stiff paste (something that looks like mashed potatoes - reference above images). This process takes me about 3 minutes. Scrape the mixture into the bowl of a stand mixer fitted with the dough hook attachment.
- Add the sour cream, sugar, kosher salt, 2 eggs, 4 Tbsp butter, and the remaining 5 cups (650g) bread flour, and the yeast to the bowl with the milk mixture. Beat on low speed until a shaggy dough forms, about 1 minute.
- Increase the speed to medium and mix until a smooth and supple dough forms. This process takes me about 8 to 10 minutes. Tip: if your dough seems a little bit too sticky, add more flour, 1 Tbsp at a time, until the dough is no longer too tacky.
- Scrape the dough out onto an unfloured work surface, and form into a ball. Place the dough back into the same bowl and cover with plastic wrap. Let it sit in a warm place (I put mine in a cold oven with the oven light on) until it's roughly doubled in size, about 1 to 1 1/2 hours.
- While the dough is rising, prepare your 13 x 9 inch cake pan. Use an offset spatula to smear 2 Tbsp butter across the bottom and on the sides of the pan.
Forming the rolls
- Uncover the dough and use your fist to "punch it down." You want to expel some of the gases that have built up during proofing. Turn the dough out onto a very lightly floured surface and stretch it into a square.
- Roll the dough out into a 12-inch square, and sprinkle 2 Tbsp garlic evenly over the dough. Starting at one end, fold the dough several times to enclose the garlic in the dough.
- Then, roll the dough out into about a 16 x 6 rectangle. Use a bench scraper to cut the dough into 2-inch square pieces. You'll want 24 rolls, so set yourself up to cut in an 8 x 3 grid).
- Grab one portion of the dough and form it into a ball. I like to gently move the base of the ball along the countertop to seal the bottom edges. Place in the prepared pan, and repeat the process with each roll.
- Cover the pan with plastic wrap and let it sit at room temperature until the rolls have roughly doubled in size, about 45 minutes. If you are making these overnight rolls, stop here and read the instructions detailed above.
Baking the rolls
- Meanwhile, preheat the oven to 375°F. Beat the remaining egg in a small bowl until no streaks remain. Uncover the rolls and brush the egg evenly over each roll.
- Lightly sprinkle with flaky sea salt and black pepper. Bake 25 to 30 minutes or until the tops of the rolls are a deep golden brown.
- Meanwhile, melt the remaining 2 Tbsp butter in a small bowl. Stir in the remaining 1 Tbsp garlic. When the rolls are done, immediately brush the butter mixture evenly over the rolls. Cool for about 20 minutes (or until they're no longer too hot to handle) at room temperature.
Will never make another dinner roll recipe – made for Thanksgiving and everyone loved them!!
These rolls are hands down the best rolls I’ve ever had. My husband and I could not stop eating them! This will be the only recipe I ever use moving forward!! MAKE THEM!
I’m so glad you loved them Mikayla! Thank you!