Your search for the perfect homemade pie crust is over. Enjoy these step-by-step instructions for the most flaky, decadent homemade pie crust that we can’t get enough of!

All-purpose Homemade Pie Crust
If there’s one thing we all know about the South – it’s that we looooove our pie. Lemon meringue pie in the spring, cherry pie in the summer, apple pie in the fall, and pecan pie in the winter. It truly doesn’t get much better than that.
I think I’ll always be able to remember my Grandma Helen’s famous pecan pie – she’d make it every Thanksgiving and it was everyone’s favorite post-dinner dessert alongside a generous scoop of vanilla bean ice cream. We all know those 2 are a match made in heaven, truly. I think most of the time she used a store-bought pie crust, and there was absolutely no problem with that. The pie tasted nostalgic and delicious no matter the crust.
But I must say: when I started on my quest to create the best homemade pie crust, I was shocked by the results – and I mean the difference in the way the pie as a whole tasted when you make your own crust. But not only that – when you create a flaky pie crust, one that holds its shape when baked, where you can take a slice out of it and it stays intact in your hand – that is what makes or breaks a pie in my opinion. And I want to share all of that with you!!

What is Homemade Pie Crust?
Normally when you’d make a pie you’d probably just go to the store and buy a box of pre-made pie dough. These work great, and I use them occasionally in my home too, but when you take the time to make your own from scratch – you truly will never go back (especially when you realize how quick and easy it is).
Homemade pie crust is made up of just 5 simple ingredients – flour, granulated sugar, butter, salt, and a liquid of some kind – in my case, buttermilk. It comes together in a matter of minutes and it’s a staple here in my kitchen.
You can use pie crust for all sorts of things. Pies mainly (obviously), but it has other uses as well like this Giant Blueberry Pop Tart. You can use this recipe for both a bottom crust and a top crust, though you’ll need to double it if you’re making both.
What makes this one special?
The method for this recipe is based off of Claire Saffitz’s homemade pie crust from her cookbook Dessert Person. Most of what I know I learned from Claire, I like to look at her as my baking fairy godmother lol. She’s a great teacher and an incredible pastry chef.
What makes this pie crust different than probably the majority of ones you’ve seen is I’m using buttermilk instead of water as my liquid ingredient. Buttermilk is basically just pure fat, and with that comes incredibly flaky, rich layers of pie crust. You can absolutely substitute water for the buttermilk, but note that you’ll need less water as buttermilk contains less moisture. So, still just add the water 1 Tbsp at a time until you reach a shaggy dough, but you’ll just need less than you would if you were using buttermilk.
Equipment you may need…
- Food processor: this is definitely not a must-have, but it helps make the process a lot simpler and easier. Just a basic one will do.
- Pastry blender: if you’re not using a food processor, I’d definitely recommend having one of these on hand to cut the butter into the flour.
- Rolling pin: this is the one I use for everything. It’s only $7 and it does the job. I prefer using rolling pins without handles on the ends so I get more even pressure.
- Mixing bowls: I love these glass mixing bowls from Amazon. They’re especially perfect for food photography.
- Wooden spoon: I only use wooden spoons and rubber spatulas when I’m baking, and I love these!
- Measuring cups/spoons: I’ve been linking these in all of my posts because I love them SO much! They are beautiful and look just like some other expensive ones on the market (but wayyy cheaper).
- Liquid measuring cups: every baker needs one of these in their kitchen. You should never use a dry measuring cup to measure liquid ingredients – the amounts may vary slightly. I recommend this set of 3 – they’re perfect for your kitchen!
- Parchment Paper Sheets: I do and always will buy my parchment paper in sheets from Amazon. I would never ever go back to the rolls because they’re just soooo much easier to work with. Order some and I promise you’ll agree!

Ingredients for Homemade Pie Crust
- All-purpose flour
- Granulated sugar
- Kosher salt
- Unsalted butter
- Full-fat buttermilk
Now let’s get into the how-to:
Step 1 – Combine your dry ingredients

Remember, we’re using a food processor here, so just add all your dry ingredients directly to the bowl. Then give it all a couple pulses just to combine everything.
Step 2 – Add the butter

Now we’re going to add the butter to the flour mixture.
Pro-tip: always cut your butter into small, 1/2-inch cubes before you mix up your dry ingredients, then set it in the freezer so it can get extra cold.
I should also mention that I love using Kerrygold butter anytime I’m making pastry, because most of the time I need the butter to stay nice and cold but still have the ability to bend without snapping. Kerrygold is a European butter that does just that!
Step 3 – Pulse until the butter resembles the size of peas

We want the flour to coat the pieces of butter, and we want those pieces to be the size of peas. Soem larger and some smaller will be just fine, but it’s important to have varying shapes so we can get those nice flaky layers in the finished pie crust.
This takes about 5 to 10 short pulses in my food processor, and I’m assuming it’ll be the same for yours as well.
Step 4 – Begin adding buttermilk

We’re going to transfer the butter and flour mixture to a large bowl, because we want to start working with our hands.
We’re going to start adding the cold buttermilk, just 1 Tbsp at a time, until a shaggy dough forms. I recommend mixing everything using only a small fork. It usually takes me around 8 to 10 Tbsp of buttermilk to get here, but it could take you a little more or less depending on your ingredients.
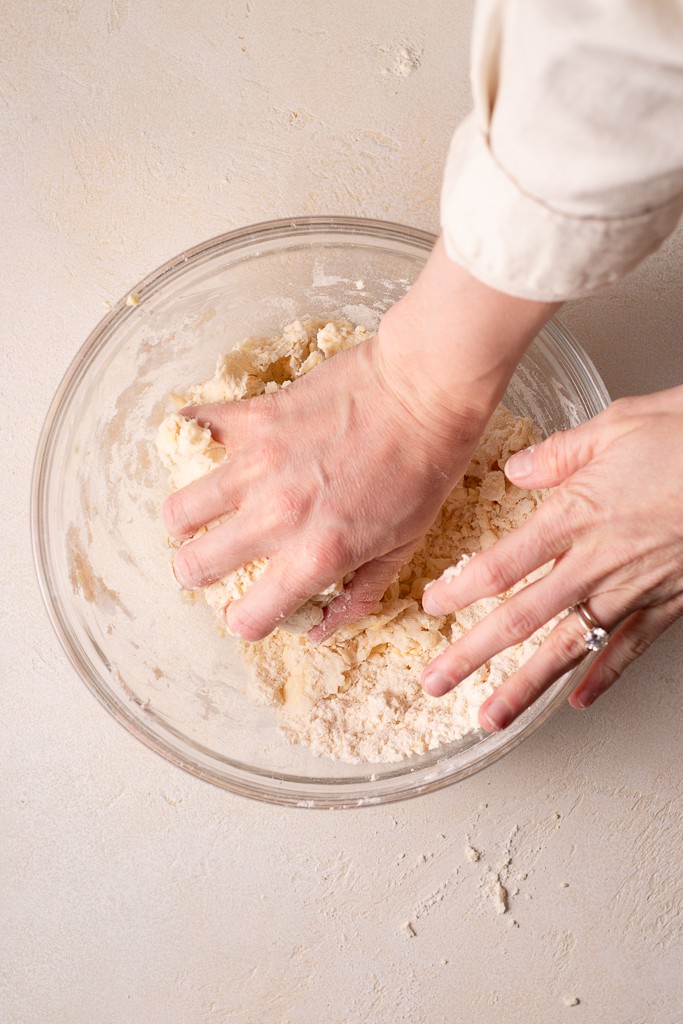
Step 5 – Gently knead with your hands

I like to use my hands after I’ve finished adding the majority of my buttermilk. This allows me to press everything together, and there’s truly just something special about getting your hands involved and feeling the texture of the dough – it’s way better than using a spoon!
Pro-Tip: if you have 1 large ball of dough come together, but there’s still a little bit of loose crumbs left at the bottom of the bowl, remove the large ball of dough to a sheet of plastic wrap, and add 1 tsp buttermilk at a time to the loose crumbs until another dough ball begins to form. We don’t want to overwork the dough, so separating it from any crumbs makes this easier. Then you’ll just add the new dough to the rest of the dough ball on the plastic wrap.
Step 6 – Tightly wrap the dough in plastic wrap
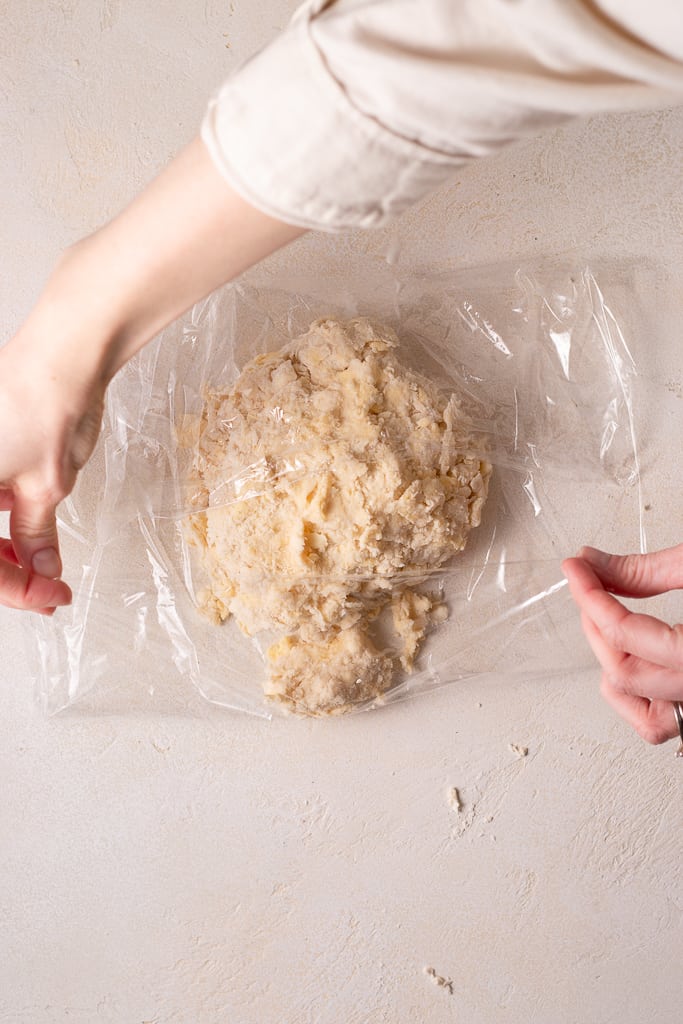
The dough needs to relax before we use it, really for about 2 hours, but it will work just fine if you only have 30 minutes. This will help everything roll out much easier. You should be able to see larger pieces of butter in the dough – this is what we want to see!

I like place it in the plastic wrap, then give it a little roll so everything is evenly distributed (this will help it chill more evenly).
Step 7 – Roll out the dough & fit into pie plate
Roll out your crust to a 1/4-inch thick circle, and place it in an ungreased pie plate. Try to get things as even as possible, and trim the edges with a pair of kitchen shears so that about 1/2-inch of dough hangs over the sides of the pie plate.
Pro-Tip: it’s vitally important that you press the dough firmly onto the pie plate, and I’m talking every nook and cranny. If you want to have the least amount of shrinkage as possible, press the dough firmly into the corner where the bottom meets the sides of the pie plate. Don’t be afraid to press to hard here, we don’t want our homemade pie crust to shrink down!
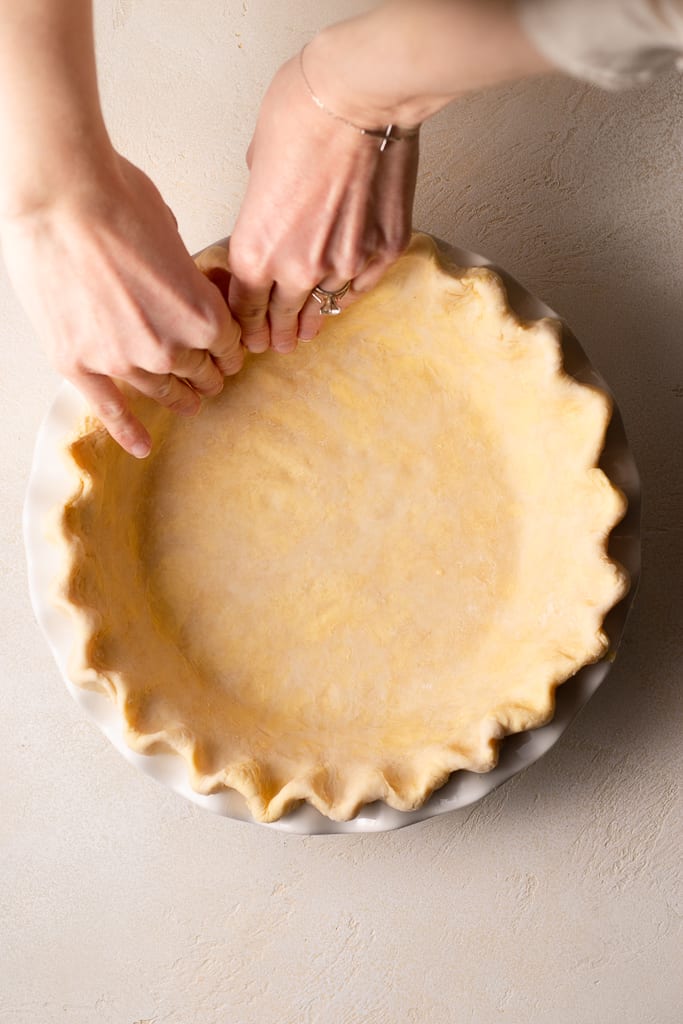
Step 8 – Crimp the edges
You’ll then fold the overhang underneath itself and crimp the edges however you’d like to. I press my thumb in between 2 other fingers to create somewhat of a triangular shape. Do this all the way around the edge.
Step 9 – Fill, parbake, or completely bake

This next step depends on which kind of pie you’re going to be making. There are 3 things you can do from here on out:
- Fill & bake: if the recipe you’re using involves filling the raw pie crust and baking it all together, you won’t need to use pie weights. You’ll just follow the recipe instructions exactly as stated.
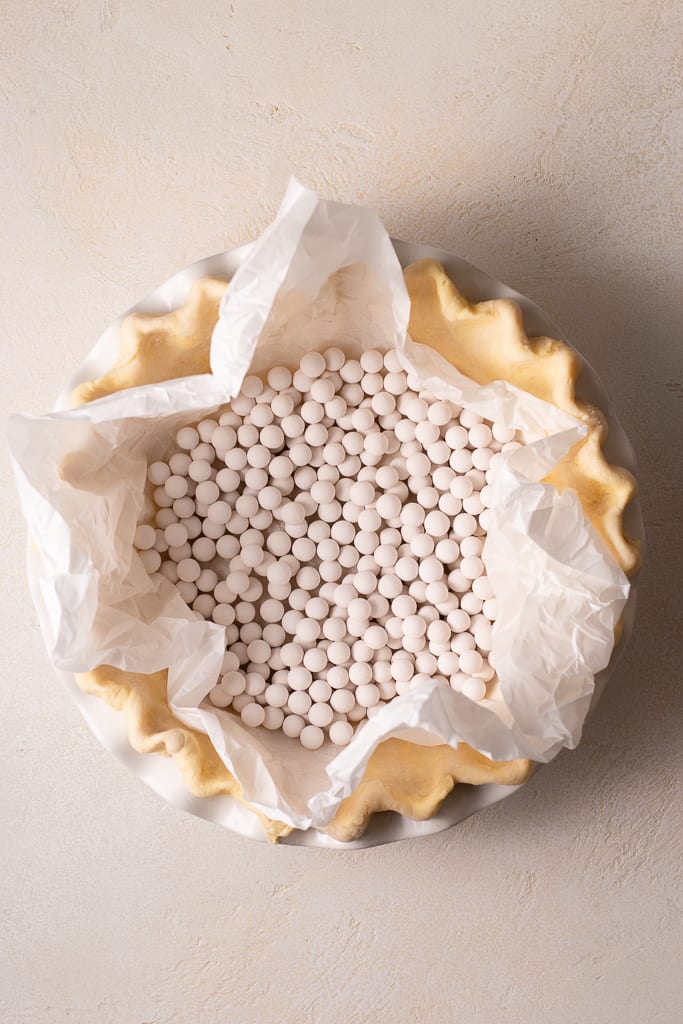
- Parbake: This is the most common technique you’ll see when baking a pie. This involves filling the crust with pie weights (or you can use dried beans or rice), baking the crust for about 10 to 15 minutes, removing the pie weights, adding your filling, and baking the pie completely. This decreases your chances of having a “soggy bottom,” as the crust will be halfway baked before you add the filling.
- Fully bake: if you’re making something like French silk pie, lemon meringue pie, or anything that requires a completely baked pie crust, you’ll fill your raw crust with pie weights, bake it for about 10 to 15 minutes, remove the pie weights, and continue baking it for about another 20 minutes or until it becomes a dark golden brown. Then you’ll simply let it cool completely at room temperature, fill the crust with your desired filling, and it’s ready to serve.
I hope you all adore this recipe as much as I do, and please please if you have any questions or concerns feel free to drop me a line at sarah@sarahsdayoff.com or comment down below. I love hearing from you guys!
If you conquer this pie crust recipe be sure to tag me @sarahsdayoff so I can see it and celebrate with you!
Love,
Sarah
“I am the good shepherd. The good shepherd sacrifices his life for the sheep.” -John 10:11-

All-Purpose Homemade Pie Crust
Ingredients
- 10 Tbsp unsalted butter
- 3/4 cup buttermilk full-fat
- 1 1/2 cups all-purpose flour
- 1 Tbsp granulated sugar
- 3/4 tsp kosher salt
Instructions
- Cut the butter into 1/2-inch cubes, and place it in the freezer until it's ready to use. Measure out your buttermilk and set it in the freezer until it's ready to use as well.
- Add flour, sugar, and salt to the bowl of a food processor. Pulse 5 times to combine the ingredients.
- Add the cubes of cold butter to the dry ingredients and pulse 7 to 10 times or until the butter resembles the size of peas (use above photos for reference). Transfer mixture to a separate large bowl.
- Drizzle in the cold buttermilk, 1 Tbsp at a time, mixing with a fork to distribute evenly (this usually takes me about 8 to 10 Tbsp of buttermilk). Switch to your hands and toss the mixture several times until shaggy pieces of dough form, then gently knead the mixture inside the bowl a few times to bring it together (the dough will look very clumpy and dry, with loose bits).
- Line your work surface with a sheet of plastic wrap, then transfer any large clumps of dough to the plastic. Tossing again with a fork, drizzle more buttermilk, 1 tsp at a time, until only a few dry spots remain, then knead with your hands to bring it together into a dough. Transfer the last bits of dough to the plastic wrap.
- Wrap the dough in the plastic wrap and use a rolling pin to flatten the dough into an even disc. Transfer the dough to the refrigerator and chill 2 hours, but at least 30 minutes.
- Unwrap the dough and place on a lightly floured surface. Use a rolling pin to roll the dough out into a 1/4 to 1/2-inch thick circle, flouring the surface as needed to prevent sticking as you roll.
- Roll the dough up onto the rolling pin and transfer it to your pie plate, unrolling it over top of the plate. Let the pastry slump gently down the sides into the bottom. Firmly press the dough into the bottom and up the sides of the plate, ensuring contact everywhere and taking care not to stretch it.
- Trim the dough using kitchen shears so that there's about 1/2-inch of overhanging dough. Press any scraps into areas where there's not a 1/2-inch overhang.
- Tuck the overhang underneath itself all the way around so you have a lip of double-thick pastry resting just around the rim of the pie plate.
- Press down firmly around the rim to seal, then crimp the crust all the way around, using the thumb of one hand and the thumb and forefinger of the other. You can also use a fork to press down on the edges of the dough for this.
To Fill-and-Bake:
- This pie crust is now ready to use. Continue with your recipe as stated.
For a Parbaked Crust:
- Preheat the oven to 425°F. Freeze the lined pie plate for at least 10 minutes while the oven preheats. Prick the bottom of the pastry in several places with a fork to prevent puffing. Place a sheet of parchment paper over the pie crust, and pour pie weights or dried beans into the parchment paper to completely cover the bottom of the crust.
- Place the pie plate on a sheet pan and bake the crust for 25 to 30 minutes or until you see it beginning to turn a light golden brown. Remove the pie weights and continue with the recipe as stated.
For a Fully-Baked Crust:
- Preheat the oven to 425°F. Freeze the lined pie plate for at least 10 minutes while the oven preheats. Prick the bottom of the pastry in several places with a fork to prevent puffing. Place a sheet of parchment paper over the pie crust, and pour pie weights or dried beans into the parchment paper to completely cover the bottom of the crust.
- Place the pie plate on a sheet pan and bake the crust for 25 to 30 minutes or until you see it beginning to turn a light golden brown. Remove the pie weights, lower the oven temperature to 350°F, and continue baking the pie crust for an additional 20 minutes, until it turns a deep golden brown color.
Notes
This blog post contains affiliate links which make me a small commission at no cost to you. Thank you for supporting Sarah’s Day Off!


Leave A Comment